This blog is been written as part of Spring integration with other technologies. In this blog I am going to explain how to integrate JMS(Java Messaging Service) with spring and to use template mechanism of spring for easy integration of JMS. Spring provides a template mechanism to hide the details of a typical JMS implementation so developers can concentrate on the
actual task of processing messages instead of worrying about how to create, access, or clean up JMS resources.As like other posts on integration I am supposing that you know spring and jms as I will just taking an example which will explain a “Hello World” type example of JMS with Spring.
I will be using Apache ActiveMQ as Message Broker. Please
download the latest one from http://activemq.apache.org/activemq-520-release.html.
So let’s see how can we integrate JMS with Spring. You can get the source code from
http://www.mediafire.com/download.php?wmqmfcnqnjm
Step 1. Configuring the Connection Factory
First thing we have to do is to create connection factory instance which will provide entry point to interact with Message Broker. This is connection factory will be used for sending and receiving messages. Here is the bean definition which will get into your spring configuration file.
<!-- JMS Queue Connection Factory-->
<bean id="activeMQConnectionFactory"
class="org.apache.activemq.ActiveMQConnectionFactory">
<property name="brokerURL" value="tcp://localhost:61616" />
</bean>
Step2. Configuring the Message Destination
You can use both queue and topic mode for sending and
receving the messages.
For queue:
<bean id="springJmsQueue" class="org.apache.activemq.command.ActiveMQQueue">
</bean>
And for Topic:
<bean id="springJmsTopic" class="org.apache.activemq.command.ActiveMQTopic">
</bean>
Step 3. Defining the JMS Template class
Normally we create the connection factory instance ,then we create the session and the we send the message and hell lot of try catch blocks and code for closing sessions. Spring's JMSTemplate class simplifies the life of sending the message. Here is the declaration of the JMS Template class as a Spring bean,
<!-- JMS Queue Template -->
<bean id="jmsQueueTemplate"
class="org.springframework.jms.core.JmsTemplate">
<property name="connectionFactory">
<ref bean="activeMQConnectionFactory"/>
</property>
<property name="defaultDestination" ref="ideekshaQueue"></property>
</bean>
JMS Template takes reference for the connection factory through which it will connect to Message Broker.I have used default destination queue to sens and receive messages, you can use you own and declare them for jms receiver and jms sender.
Step 4. Sending a message
Here is the code for sending the JMS message using
JMSTemplate.
JmsSender.java
-------------------------------------------------------------
package com.ideeksha.spring.jms;
import org.springframework.jms.core.JmsTemplate;
public class JmsSender {
private JmsTemplate jmsTemplate;
public JmsTemplate getJmsTemplate() {
return jmsTemplate;
}
public void setJmsTemplate(JmsTemplate jmsTemplate) {
this.jmsTemplate = jmsTemplate;
}
public void sendMesage() {
jmsTemplate.convertAndSend("HelloWorld!!!!");
}
}
jmsTemplate.convertAndSend() takes destination and the message, as I have use defaultDestination in template it will take that destination and if you want to override this you can pass other destination to convertAndSend().
This is the bean definition for JmsSender.
<bean id="jmsSender" class="com.ideeksha.spring.jms.JmsSender">
<property name="jmsTemplate">
<ref bean="jmsQueueTemplate"/>
</property>
</bean>
Step 5. Receiving the message
Here is the code for receiving the JMS message using JMSTemplate.
JmsReceiver.java
-------------------------------------------------
package com.ideeksha.spring.jms;
import javax.jms.Message;
import javax.jms.TextMessage;
import org.springframework.jms.core.JmsTemplate;
public class JmsReceiver {
private JmsTemplate jmsTemplate;
public JmsTemplate getjmsTemplate() {
return jmsTemplate;
}
public void setjmsTemplate(JmsTemplate jmsTemplate) {
this.jmsTemplate = jmsTemplate;
}
public void processMessage() {
Message msg = jmsTemplate.receive();
try {
TextMessage textMessage = (TextMessage)msg;
if (msg != null) {
System.out.println(" Message Received -->"+ textMessage.getText());
}
} catch (Exception e) {
e.printStackTrace();
}
}
}
And here is the bean definition for the message receiver class,
<bean id="jmsReceiver" class="com.ideeksha.spring.jms.JmsReceiver">
<property name="jmsTemplate">
<ref bean="jmsQueueTemplate"/>
</property>
</bean>
Step 6. Running this application
First we can provide this as a service by declaring a service interface.
This is my service interface:
JmsService.java
-------------------------------------------
package com.ideeksha.spring.jms;
public interface JmsService {
public abstract void process();
}
And here is its implementation
JmsServiceImpl.java
------------------------------------------------------------------
package com.ideeksha.spring.jms;
public class JmsServiceImpl implements JmsService {
private JmsSender sender;
private JmsReceiver receiver;
public JmsSender getSender() {
return sender;
}
public void setSender(JmsSender sender) {
this.sender = sender;
}
public JmsReceiver getReceiver() {
return receiver;
}
public void setReceiver(JmsReceiver receiver) {
this.receiver = receiver;
}
public void process() {
sender.sendMesage();
// uncomment below lines for checking in active mq admin GUI
// try {
// Thread.sleep(10000);
// } catch(InterruptedException e) {
// e.printStackTrace();
// }
receiver.processMessage();
}
}
And finally the main class which will execute this:
App.java
----------------------------------------------------------------------
package com.ideeksha.spring.jms;
import org.springframework.context.ApplicationContext;
import org.springframework.context.support.ClassPathXmlApplicationContext;
public class App {
public static void main(String[] args) {
ApplicationContext ctx = new ClassPathXmlApplicationContext("applicationContext.xml");
JmsServiceImpl service =(JmsServiceImpl) ctx.getBean("jmsService");
service.process();
}
}
And the bean definition for all of this is
<bean id="jmsService" class="com.ideeksha.spring.jms.JmsServiceImpl">
<property name="sender">
<ref bean="jmsSender"/>
</property>
<property name="receiver">
<ref bean="jmsReceiver"/>
</property>
</bean>
But this is synchronous JMS code, but we use jms for asynchronous communication.
So for this we have to modify the Service implementaion and remove the receiver
code.
So out new implementation file will be
JmsServiceImpl.java
--------------------------------------------------------------------
package com.ideeksha.spring.jms;
public class JmsServiceImpl implements
JmsService {
private JmsSender sender;
private JmsReceiver receiver;
public JmsSender getSender() {
return sender;
}
public void setSender(JmsSender sender) {
this.sender = sender;
}
public JmsReceiver getReceiver() {
return receiver;
}
public void setReceiver(JmsReceiver receiver) {
this.receiver = receiver;
}
public void process() {
sender.sendMesage();
}
}
And there will be Message Listener which will listen for one particular destincation queue/topic.
So we have Listener class which will be implementing MessageListener imterface.
Listener.java
-----------------------------------------------------------
package com.ideeksha.spring.jms;
import javax.jms.JMSException;
import javax.jms.Message;
import javax.jms.MessageListener;
import javax.jms.TextMessage;
public class Listener implements MessageListener {
public void onMessage(Message msg) {
if (msg instanceof TextMessage) {
try {
System.out.println("Received msg asynchronously: " + ((TextMessage) msg).getText());
} catch (JMSException e) {
e.printStackTrace();
}
} else {
throw new RuntimeException("This message should be of type TextMessage");
}
}
}
And the bean definition for this is
<!-- This is the Message Driven Pojo (MDP) -->
<bean id="messageListener" class="com.ideeksha.spring.jms.Listener" />
We have to put this Listener in jms Container. For that this is the bean definition of jms container
<!-- This is the message listener container -->
<bean id="jmsContainer" class="org.springframework.jms.listener.DefaultMessageListenerContainer">
<property name="connectionFactory" ref="activeMQConnectionFactory"/>
<property name="destination" ref="ideekshaQueue" />
<property name="messageListener" ref="messageListener" />
</bean>
Which will have reference for jms queue on which it will be listening and the listener reference.
In the sample code what I have attached is having synchronous functionality, if you want to do asynchronous uncomment the listener and the container definition from the configuration file.
Monday, June 15, 2009
Tuesday, June 2, 2009
Spring WebService with Castor
This tutorial is all about Spring based contract-first based web-services.
I am also demostrating how to use Castor as marshaller and unmashaller.
The client for web-service I am using as SOAP UI which will generate the
SOAP request for the web-service and offcourse it will also show the response
sent by the web-service.
For developing web services I will start with the XML Schema/WSDL because it is contract first web-service followed by the Java code second. Spring-WS focuses on this development style, and this tutorial will help you get started. Note that the first part of this tutorial contains almost no Spring-WS specific information: it is mostly about XML, XSD, and WSDL. The second part focusses on implementing this contract using Spring-WS .
The most important thing when doing contract-first Web service development is
to try and think in terms of XML. This means that Java-language concepts are
of lesser importance. It is the XML that is sent across the wire, and you
should focus on that. The fact that Java is used to implement the Web service
is an implementation detail. An important detail, but a detail nonetheless.
In this tutorial, we will define a Web service that is created by a Store
department. Clients can send order request to this service to add a order.
1.2. Messages
In this section, we will focus on the actual XML messages that are sent to
and from the Web service. We will start out by determining what these messages
look like.
1.2.1. Order
In the scenario, we have to deal with Order requests, so it makes sense
to determine what a Order looks like in XML:
<OrderRequest>
<item>
<id>13245</id>
<itemName>Keyboard</itemName>
<quantity>10</quantity>
<discount>0</discount>
<sellingprice>3000</sellingprice>
</item>
<item>
<id>13247</id>
<itemName>Monitor</itemName>
<quantity>10</quantity>
<discount>0</discount>
<sellingprice>90000</sellingprice>
</item>
<customerID>898798</customerID>
<orderID>8797</orderID>
</OrderRequest>
A OrderRequest consists of customer id ,order id and the list of items that are in order. We have also decided to use the "string" elements, because that will save a lot of parsing hassle.
1.3. Data Contract
Now that we have seen some examples of the XML data that we will use,
it makes sense to formalize this into a schema. This data contract
defines the message format we accept. There are four different ways
of defining such a contract for XML:
DTDsXML
Schema (XSD)
RELAX
NGSchematron
DTDs have limited namespace support, so they are not suitable for Web
services. Relax NG and Schematron certainly are easier than XML Schema.
Unfortunately, they are not so widely supported across platforms. We
will use XML Schema.
By far the easiest way to create an XSD is to infer it from sample
documents. Any good XML editor or Java IDE offers this functionality.
Basically, these tools use some sample XML documents, and generate a
schema from it that validates them all. The end result certainly needs
to be polished up, but it's a great starting point.
This is our final xsd:
orderService.xsd
---------------------------------
<?xml version="1.0" encoding="UTF-8"?>
<schema xmlns="http://www.w3.org/2001/XMLSchema" xmlns:ideeksha-spring-ws="http://ideeksha.gotdns.com/order" targetNamespace="http://ideeksha.gotdns.com/order" elementFormDefault="qualified">
<complexType name="item">
<sequence>
<element name="id" type="string" minOccurs="1"/>
<element name="itemName" type="string" minOccurs="1"/>
<element name="quantity" type="string" minOccurs="1"/>
<element name="discount" type="string" minOccurs="1"/>
<element name="sellingprice" type="string" minOccurs="1"/>
</sequence>
</complexType>
<complexType name="order-response">
<sequence>
<element name="code" type="string" minOccurs="1"/>
</sequence>
</complexType>
<complexType name="order-request">
<sequence>
<element name="item" type="ideeksha-spring-ws:item" minOccurs="1" maxOccurs="unbounded"/>
<element name="customerID" type="string" minOccurs="1"/>
<element name="orderID" type="string" minOccurs="1"/>
</sequence>
</complexType>
<element name="OrderRequest" type="ideeksha-spring-ws:order-request"/>
<element name="OrderResponse" type="ideeksha-spring-ws:order-response"/>
</schema>
1.4. Service contract
A service contract is generally expressed as a WSDL file.
Note that in Spring-WS, writing the WSDL by hand is not required. Based on the XSD and some conventions, Spring-WS can create the WSDL for you, as explained in the section entitled Section 3.6, “Implementing the Endpoint”.
This is our final wsdl file generated by Spring :
http://localhost:8080/SpringWebService/order-ws/orderWebService.wsdl
---------------------------------------------------------------------------
<?xml version="1.0" encoding="UTF-8"?><wsdl:definitions xmlns:wsdl="http://schemas.xmlsoap.org/wsdl/" xmlns:sch="http://ideeksha.gotdns.com/order" xmlns:soap="http://schemas.xmlsoap.org/wsdl/soap/" xmlns:tns="http://ideeksha.gotdns.com/order" targetNamespace="http://ideeksha.gotdns.com/order">
<wsdl:types>
<schema xmlns="http://www.w3.org/2001/XMLSchema" xmlns:ideeksha-spring-ws="http://ideeksha.gotdns.com/order" elementFormDefault="qualified" targetNamespace="http://ideeksha.gotdns.com/order">
<complexType name="item">
<sequence>
<element minOccurs="1" name="id" type="string"/>
<element minOccurs="1" name="itemName" type="string"/>
<element minOccurs="1" name="quantity" type="string"/>
<element minOccurs="1" name="discount" type="string"/>
<element minOccurs="1" name="sellingprice" type="string"/>
</sequence>
</complexType>
<complexType name="order-response">
<sequence>
<element minOccurs="1" name="code" type="string"/>
</sequence>
</complexType>
<complexType name="order-request">
<sequence>
<element maxOccurs="unbounded" minOccurs="1" name="item" type="ideeksha-spring-ws:item"/>
<element minOccurs="1" name="customerID" type="string"/>
<element minOccurs="1" name="orderID" type="string"/>
</sequence>
</complexType>
<element name="OrderRequest" type="ideeksha-spring-ws:order-request"/>
<element name="OrderResponse" type="ideeksha-spring-ws:order-response"/>
</schema>
</wsdl:types>
<wsdl:message name="OrderResponse">
<wsdl:part element="tns:OrderResponse" name="OrderResponse">
</wsdl:part>
</wsdl:message>
<wsdl:message name="OrderRequest">
<wsdl:part element="tns:OrderRequest" name="OrderRequest">
</wsdl:part>
</wsdl:message>
<wsdl:portType name="OrderResource">
<wsdl:operation name="Order">
<wsdl:input message="tns:OrderRequest" name="OrderRequest">
</wsdl:input>
<wsdl:output message="tns:OrderResponse" name="OrderResponse">
</wsdl:output>
</wsdl:operation>
</wsdl:portType>
<wsdl:binding name="OrderResourceSoap11" type="tns:OrderResource">
<soap:binding style="document" transport="http://schemas.xmlsoap.org/soap/http"/>
<wsdl:operation name="Order">
<soap:operation soapAction=""/>
<wsdl:input name="OrderRequest">
<soap:body use="literal"/>
</wsdl:input>
<wsdl:output name="OrderResponse">
<soap:body use="literal"/>
</wsdl:output>
</wsdl:operation>
</wsdl:binding>
<wsdl:service name="OrderResourceService">
<wsdl:port binding="tns:OrderResourceSoap11" name="OrderResourceSoap11">
<soap:address location="http://localhost:8080/SpringWebService/order-ws/orderWebService"/>
</wsdl:port>
</wsdl:service>
</wsdl:definitions>
I define the OrderRequest message, which gets used in the
portType.
The OrderRequest type is defined in the schema.
I define the OrderResource port type, which gets used in the
binding.
I use a document/literal style.
The literal http://schemas.xmlsoap.org/soap/http signifies a
HTTP transport.
The soapAction attribute signifies the SOAPAction HTTP
header that will be sent with every request.
The http://localhost:8080/SpringWebService/order-ws/SpringWebService address is the URL where the web-service can be invoked.
This is the final WSDL. We will describe how to implement the resulting schema and WSDL in the next section.
1.5. Creating the project
In this section, we will be using Maven2 to create the
initial project structure for us. Doing so is not required, but greatly reduces the amount of code we have to write to setup our HolidayService.
The following command creates a Maven2 web application project for us, using the Spring-WS archetype (that is, project template)
mvn archetype:create -DarchetypeGroupId=org.springframework.ws \
-DarchetypeArtifactId=spring-ws-archetype \
-DarchetypeVersion=1.5.7 \
-DgroupId=com.ideeksha.spring.ws \
-DartifactId=SpringWebService
This command will create a new directory called SpringWebService. In this directory,
there is a 'src/main/webapp' directory, which will contain the root of the WAR file.
You will find the standard web application deployment descriptor 'WEB-INF/web.xml' here, which defines a Spring-WS MessageDispatcherServlet and maps all incoming requests to this servlet:
<web-app xmlns="http://java.sun.com/xml/ns/j2ee"
xmlns:xsi="http://www.w3.org/2001/XMLSchema-instance"
xsi:schemaLocation="http://java.sun.com/xml/ns/j2ee
http://java.sun.com/xml/ns/j2ee/web-app_2_4.xsd"
version="2.4">
<display-name>Store Department Order Service</display-name>
<servlet>
<servlet-name>order-ws</servlet-name>
<servlet-class>org.springframework.ws.transport.http.MessageDispatcherServlet</servlet-class>
</servlet>
<servlet-mapping>
<servlet-name>order-ws</servlet-name>
<url-pattern>/order-ws/*</url-pattern>
</servlet-mapping>
</web-app>
In addition to the above 'WEB-INF/web.xml' file, you will also need another,
Spring-WS-specific configuration file, named 'WEB-INF/order-ws-servlet.xml'.
This file contains all of the Spring-WS-specific beans such as EndPoints,
WebServiceMessageReceivers, and such like, and is used to create a new Spring container.
The name of this file is derived from the name of the attendant servlet (in this case
'order-ws') with '-servlet.xml' appended to it.
1.6. Implementing the Endpoint
In Spring-WS, you will implement Endpoints to handle incoming XML messages.
There are two flavors of endpoints: message endpoints and
payload endpoints. Message endpoints give access to the entire XML message, including SOAP headers. Typically, the endpoint will only be interested in the payload of the message, that is the contents of the SOAP body.
In that case, creating a payload endpoint makes more sense.
1.6.1. Handling the XML Message
In this sample application, we are going to use Castor to handle
the XML message.
OrderWSEndpoint.java
------------------------------
package com.ideeksha.order.ws;
import java.util.Iterator;
import java.util.List;
import org.apache.commons.logging.Log;
import org.apache.commons.logging.LogFactory;
import org.springframework.ws.server.endpoint.annotation.Endpoint;
import org.springframework.ws.server.endpoint.annotation.PayloadRoot;
@Endpoint
public class OrderWSEndpoint {
private static final Log LOG = LogFactory.getLog(OrderWSEndpoint.class);
@PayloadRoot(localPart = "OrderRequest", namespace = "http://ideeksha.gotdns.com/order")
public OrderResponse receiveOrder(
OrderRequest orderRequest) {
try {
List<Item> itemList = orderRequest.getItemList();
Iterator<Item> iterator = itemList.iterator();
while (iterator.hasNext()) {
Item item = iterator.next();
System.out.println(item);
}
} catch (Exception e) {
LOG.error("", e);
}
OrderResponse orderResponse = new OrderResponse();
orderResponse.setCode("SUCCESS");
return orderResponse;
}
}
We are using annoation to mark a class as Endpoint and the method which is to be executed for the particular type of request is denoted by
"@PayloadRoot(localPart = "OrderRequest", namespace = "http://ideeksha.gotdns.com/order")" anotaion.
So "receiveOrder" ,method will get executed if any OrderRequest is come for this EndPoint.
Because we use Castor, we must add some dependencies to the Maven pom.xml, which is in the root of our project directory. Here is the part of POM file:
<dependency>
<groupId>org.springframework.ws</groupId>
<artifactId>spring-ws-core-tiger</artifactId>
<version>1.5.6</version>
<exclusions>
<exclusion>
<groupId>log4j</groupId>
<artifactId>log4j</artifactId>
</exclusion>
</exclusions>
</dependency>
<dependency>
<groupId>jdom</groupId>
<artifactId>jdom</artifactId>
<version>1.0</version>
<exclusions>
<exclusion>
<groupId>log4j</groupId>
<artifactId>log4j</artifactId>
</exclusion>
</exclusions>
</dependency>
<dependency>
<groupId>jaxen</groupId>
<artifactId>jaxen</artifactId>
<version>1.1</version>
<exclusions>
<exclusion>
<groupId>log4j</groupId>
<artifactId>log4j</artifactId>
</exclusion>
</exclusions>
</dependency>
<dependency>
<groupId>javax.xml.soap</groupId>
<artifactId>saaj-api</artifactId>
<version>1.3</version>
<scope>runtime</scope>
<exclusions>
<exclusion>
<groupId>log4j</groupId>
<artifactId>log4j</artifactId>
</exclusion>
</exclusions>
</dependency>
<dependency>
<groupId>com.sun.xml.messaging.saaj</groupId>
<artifactId>saaj-impl</artifactId>
<version>1.3</version>
<scope>runtime</scope>
<exclusions>
<exclusion>
<groupId>log4j</groupId>
<artifactId>log4j</artifactId>
</exclusion>
</exclusions>
</dependency>
<dependency>
<groupId>org.codehaus.castor</groupId>
<artifactId>castor</artifactId>
<version>1.2</version>
<exclusions>
<exclusion>
<groupId>log4j</groupId>
<artifactId>log4j</artifactId>
</exclusion>
</exclusions>
</dependency>
<dependency>
<groupId>javax.annotation</groupId>
<artifactId>jsr250-api</artifactId>
<version>1.0</version>
</dependency>
</dependencies>
Here is how we would configure these classes in our order-ws-servlet.xml
Spring XML configuration file:
<beans xmlns="http://www.springframework.org/schema/beans">
<bean id="orderWSEndpoint" class="com.ideeksha.order.ws.OrderWSEndpoint" autowire="byName"/>
</beans>
1.6.2. Routing the Message to the Endpoint
Now that we have written an endpoint that handles the message, we must define how incoming messages are routed to that endpoint. In Spring-WS, this is the responsibility of an EndpointMapping. In this tutorial, we will route messages based on their content, by using a PayloadRootAnnotationMethodEndpointMapping. Here is how we configure a PayloadRootAnnotationMethodEndpointMapping in order-ws-servlet.xml:
<bean id="loggingInterceptor"
class="org.springframework.ws.server.endpoint.interceptor.PayloadLoggingInterceptor"/>
<bean
class="org.springframework.ws.server.endpoint.mapping.PayloadRootAnnotationMethodEndpointMapping">
<property name="interceptors">
<list>
<ref local="loggingInterceptor"/>
</list>
</property>
</bean>
This means that whenever an XML message is received it will check all the annonated EndPoint Class and check for the method which will serve the request with that particular namespace and local name.(It also adds a PayloadLoggingInterceptor,that dumps incoming and outgoing messages to the log.)
1.7. Publishing the WSDL
Finally, we need to publish the WSDL. As stated in Section 3.4, “Service contract”, we don't need to write a WSDL ourselves; Spring-WS can generate one for us based on some conventions.
Here is how we define the generation:
<bean id="orderWebService" class="org.springframework.ws.wsdl.wsdl11.DefaultWsdl11Definition">
<property name="schema" ref="orderSchema"/>
<property name="portTypeName" value="OrderResource"/>
<property name="locationUri" value="/order-ws/orderWebService"/>
<property name="targetNamespace" value="http://ideeksha.gotdns.com/order"/>
</bean>
<bean id="orderSchema" class="org.springframework.xml.xsd.SimpleXsdSchema">
<property name="xsd" value="/WEB-INF/orderService.xsd"/>
</bean>
The bean id determines the URL where the WSDL can be retrieved. In this case, the bean id is holiday, which means that the WSDL can be retrieved as holiday.wsdl in the servlet context. The full URL will typically be
http://localhost:8080/SpringWebService/order-ws/orderWebService.wsdl.
The schema property refers to the human resource schema we defined in Section 3.3, “Data Contract”, wrapped in a SimpleXsdSchema. We simply placed the schema in the WEB-INF directory of the application.
Next, we define the WSDL port type to be OrderResource.
We set the location where the service can be reached:
/order-ws/orderWebService/. We use a a relative URI and we instruct the framework to transform it dynamically to an absolute URI. Hence, if the service is deployed to different contexts we don't have to change the URI manually.
Finally, we define the target namespace for the WSDL definition itself. Setting these
is not required. If not set, we give the WSDL the same namespace as the schema.
1.8. Doing the Castor Mapping
We have to define the marshaller and unmashller for the XML messages.We define them in order-ws-servlet.xml file.
<bean id="marshaller" class="org.springframework.oxm.castor.CastorMarshaller">
<property name="mappingLocation" value="classpath:WEB-INF/castor-mapping.xml"/>
</bean>
<bean
class="org.springframework.ws.server.endpoint.adapter.GenericMarshallingMethodEndpointAdapter">
<constructor-arg ref="marshaller"/>
<constructor-arg ref="marshaller"/>
</bean>
O/X mapping is done using castor so you can assess the xml as object.Below is the OrderRequest and OrderResponse with its corresponding castor mapping:
OrderRequest.java:
-------------------
package com.ideeksha.order.ws;
import java.util.List;
public class OrderRequest {
private List<Item> itemList = null;
private String customerID;
private String orderID;
public List<Item> getItemList() {
return itemList;
}
public void setItemList(
List<Item> itemList) {
this.itemList = itemList;
}
public String getCustomerID() {
return customerID;
}
public void setCustomerID(String customerID) {
this.customerID = customerID;
}
public String getOrderID() {
return orderID;
}
public void setOrderID(String orderID) {
this.orderID = orderID;
}
}
OrderResponse.java
-----------------------
package com.ideeksha.order.ws;
public class OrderResponse {
private String code;
public String getCode() {
return code;
}
public void setCode(String code) {
this.code = code;
}
}
Item.java
--------------------
package com.ideeksha.order.ws;
public class Item {
private String id = null;
private String itemName = null;
private String sellingprice = null;
private String quantity = null;
private String discount = null;
public String getId() {
return id;
}
public void setId(String id) {
this.id = id;
}
public String getItemName() {
return itemName;
}
public void setItemName(String itemName) {
this.itemName = itemName;
}
public String getSellingprice() {
return sellingprice;
}
public void setSellingprice(String sellingprice) {
this.sellingprice = sellingprice;
}
public String getQuantity() {
return quantity;
}
public void setQuantity(String quantity) {
this.quantity = quantity;
}
public String getDiscount() {
return discount;
}
public void setDiscount(String discount) {
this.discount = discount;
}
@Override
public String toString() {
return id+ " " + itemName + " " + sellingprice + " " +quantity + " " + discount;
}
}
castor-mapping.xml
--------------------------------
<?xml version="1.0" encoding="UTF-8"?>
<!DOCTYPE mapping PUBLIC "-//EXOLAB/Castor Mapping DTD Version 1.0//EN"
"http://castor.org/mapping.dtd">
<mapping>
<description>Description of the mapping</description>
<class name="com.ideeksha.order.ws.OrderResponse">
<map-to xml="OrderResponse" ns-uri="http://ideeksha.gotdns.com/order" />
<field name="code">
<bind-xml name="code" node="element" type="string"/>
</field>
</class>
<class name="com.ideeksha.order.ws.Item">
<map-to xml="item" ns-uri="http://ideeksha.gotdns.com/order" />
<field name="id">
<bind-xml name="id" node="element" type="string"/>
</field>
<field name="itemName">
<bind-xml name="itemName" node="element" type="itemName"/>
</field>
<field name="quantity">
<bind-xml name="quantity" node="element" type="string"/>
</field>
<field name="discount">
<bind-xml name="discount" node="element" type="itemName"/>
</field>
<field name="sellingprice">
<bind-xml name="sellingprice" node="element" type="itemName"/>
</field>
</class>
<class name="com.ideeksha.order.ws.OrderRequest">
<map-to xml="OrderRequest" ns-uri="http://ideeksha.gotdns.com/order" />
<field name="customerID">
<bind-xml name="customerID" node="element" type="itemName"/>
</field>
<field name="orderID">
<bind-xml name="orderID" node="element" type="itemName"/>
</field>
<field name="itemList" type="com.ideeksha.order.ws.Item" collection="arraylist">
<bind-xml name="item" node="element" type="ideeksha-spring-ws:item"/>
</field>
</class>
</mapping>
You can create a WAR file using mvn install.
If you deploy the application (to Tomcat, Jetty, etc.), and point your browser at
this location, you will see the generated WSDL. This WSDL is ready to be used by clients, such as soapUI, or other SOAP frameworks.
I will explain how to create project in SOAPUI and send a order request to our webservice.
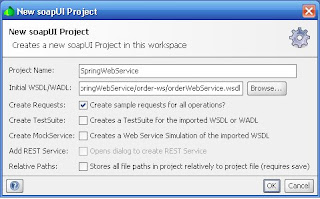
Create new Project in SOAP UI and give the project name and the wsdl file path.In my case the Project name is SpringWebSerice and the wsdl path will be
"http://localhost:8080/SpringWebService/order-ws/orderWebService.wsdl"
The click on "Order" and then to "request1" under the SpringWebService Project menu.
Edit the default values of this request.Now send this request be clicking on run button(green arrowhead) on the top of the request message window. And the you will get "SUCCESSFUL" as response as we are sending as Order response.

This conclude spring webservice turorial. You can download the source code for this article from http://www.mediafire.com/download.php?zxlmjmnuiei
The client for web-service I am using as SOAP UI which will generate the
SOAP request for the web-service and offcourse it will also show the response
sent by the web-service.
For developing web services I will start with the XML Schema/WSDL because it is contract first web-service followed by the Java code second. Spring-WS focuses on this development style, and this tutorial will help you get started. Note that the first part of this tutorial contains almost no Spring-WS specific information: it is mostly about XML, XSD, and WSDL. The second part focusses on implementing this contract using Spring-WS .
The most important thing when doing contract-first Web service development is
to try and think in terms of XML. This means that Java-language concepts are
of lesser importance. It is the XML that is sent across the wire, and you
should focus on that. The fact that Java is used to implement the Web service
is an implementation detail. An important detail, but a detail nonetheless.
In this tutorial, we will define a Web service that is created by a Store
department. Clients can send order request to this service to add a order.
1.2. Messages
In this section, we will focus on the actual XML messages that are sent to
and from the Web service. We will start out by determining what these messages
look like.
1.2.1. Order
In the scenario, we have to deal with Order requests, so it makes sense
to determine what a Order looks like in XML:
<OrderRequest>
<item>
<id>13245</id>
<itemName>Keyboard</itemName>
<quantity>10</quantity>
<discount>0</discount>
<sellingprice>3000</sellingprice>
</item>
<item>
<id>13247</id>
<itemName>Monitor</itemName>
<quantity>10</quantity>
<discount>0</discount>
<sellingprice>90000</sellingprice>
</item>
<customerID>898798</customerID>
<orderID>8797</orderID>
</OrderRequest>
A OrderRequest consists of customer id ,order id and the list of items that are in order. We have also decided to use the "string" elements, because that will save a lot of parsing hassle.
1.3. Data Contract
Now that we have seen some examples of the XML data that we will use,
it makes sense to formalize this into a schema. This data contract
defines the message format we accept. There are four different ways
of defining such a contract for XML:
DTDsXML
Schema (XSD)
RELAX
NGSchematron
DTDs have limited namespace support, so they are not suitable for Web
services. Relax NG and Schematron certainly are easier than XML Schema.
Unfortunately, they are not so widely supported across platforms. We
will use XML Schema.
By far the easiest way to create an XSD is to infer it from sample
documents. Any good XML editor or Java IDE offers this functionality.
Basically, these tools use some sample XML documents, and generate a
schema from it that validates them all. The end result certainly needs
to be polished up, but it's a great starting point.
This is our final xsd:
orderService.xsd
---------------------------------
<?xml version="1.0" encoding="UTF-8"?>
<schema xmlns="http://www.w3.org/2001/XMLSchema" xmlns:ideeksha-spring-ws="http://ideeksha.gotdns.com/order" targetNamespace="http://ideeksha.gotdns.com/order" elementFormDefault="qualified">
<complexType name="item">
<sequence>
<element name="id" type="string" minOccurs="1"/>
<element name="itemName" type="string" minOccurs="1"/>
<element name="quantity" type="string" minOccurs="1"/>
<element name="discount" type="string" minOccurs="1"/>
<element name="sellingprice" type="string" minOccurs="1"/>
</sequence>
</complexType>
<complexType name="order-response">
<sequence>
<element name="code" type="string" minOccurs="1"/>
</sequence>
</complexType>
<complexType name="order-request">
<sequence>
<element name="item" type="ideeksha-spring-ws:item" minOccurs="1" maxOccurs="unbounded"/>
<element name="customerID" type="string" minOccurs="1"/>
<element name="orderID" type="string" minOccurs="1"/>
</sequence>
</complexType>
<element name="OrderRequest" type="ideeksha-spring-ws:order-request"/>
<element name="OrderResponse" type="ideeksha-spring-ws:order-response"/>
</schema>
1.4. Service contract
A service contract is generally expressed as a WSDL file.
Note that in Spring-WS, writing the WSDL by hand is not required. Based on the XSD and some conventions, Spring-WS can create the WSDL for you, as explained in the section entitled Section 3.6, “Implementing the Endpoint”.
This is our final wsdl file generated by Spring :
http://localhost:8080/SpringWebService/order-ws/orderWebService.wsdl
---------------------------------------------------------------------------
<?xml version="1.0" encoding="UTF-8"?><wsdl:definitions xmlns:wsdl="http://schemas.xmlsoap.org/wsdl/" xmlns:sch="http://ideeksha.gotdns.com/order" xmlns:soap="http://schemas.xmlsoap.org/wsdl/soap/" xmlns:tns="http://ideeksha.gotdns.com/order" targetNamespace="http://ideeksha.gotdns.com/order">
<wsdl:types>
<schema xmlns="http://www.w3.org/2001/XMLSchema" xmlns:ideeksha-spring-ws="http://ideeksha.gotdns.com/order" elementFormDefault="qualified" targetNamespace="http://ideeksha.gotdns.com/order">
<complexType name="item">
<sequence>
<element minOccurs="1" name="id" type="string"/>
<element minOccurs="1" name="itemName" type="string"/>
<element minOccurs="1" name="quantity" type="string"/>
<element minOccurs="1" name="discount" type="string"/>
<element minOccurs="1" name="sellingprice" type="string"/>
</sequence>
</complexType>
<complexType name="order-response">
<sequence>
<element minOccurs="1" name="code" type="string"/>
</sequence>
</complexType>
<complexType name="order-request">
<sequence>
<element maxOccurs="unbounded" minOccurs="1" name="item" type="ideeksha-spring-ws:item"/>
<element minOccurs="1" name="customerID" type="string"/>
<element minOccurs="1" name="orderID" type="string"/>
</sequence>
</complexType>
<element name="OrderRequest" type="ideeksha-spring-ws:order-request"/>
<element name="OrderResponse" type="ideeksha-spring-ws:order-response"/>
</schema>
</wsdl:types>
<wsdl:message name="OrderResponse">
<wsdl:part element="tns:OrderResponse" name="OrderResponse">
</wsdl:part>
</wsdl:message>
<wsdl:message name="OrderRequest">
<wsdl:part element="tns:OrderRequest" name="OrderRequest">
</wsdl:part>
</wsdl:message>
<wsdl:portType name="OrderResource">
<wsdl:operation name="Order">
<wsdl:input message="tns:OrderRequest" name="OrderRequest">
</wsdl:input>
<wsdl:output message="tns:OrderResponse" name="OrderResponse">
</wsdl:output>
</wsdl:operation>
</wsdl:portType>
<wsdl:binding name="OrderResourceSoap11" type="tns:OrderResource">
<soap:binding style="document" transport="http://schemas.xmlsoap.org/soap/http"/>
<wsdl:operation name="Order">
<soap:operation soapAction=""/>
<wsdl:input name="OrderRequest">
<soap:body use="literal"/>
</wsdl:input>
<wsdl:output name="OrderResponse">
<soap:body use="literal"/>
</wsdl:output>
</wsdl:operation>
</wsdl:binding>
<wsdl:service name="OrderResourceService">
<wsdl:port binding="tns:OrderResourceSoap11" name="OrderResourceSoap11">
<soap:address location="http://localhost:8080/SpringWebService/order-ws/orderWebService"/>
</wsdl:port>
</wsdl:service>
</wsdl:definitions>
I define the OrderRequest message, which gets used in the
portType.
The OrderRequest type is defined in the schema.
I define the OrderResource port type, which gets used in the
binding.
I use a document/literal style.
The literal http://schemas.xmlsoap.org/soap/http signifies a
HTTP transport.
The soapAction attribute signifies the SOAPAction HTTP
header that will be sent with every request.
The http://localhost:8080/SpringWebService/order-ws/SpringWebService address is the URL where the web-service can be invoked.
This is the final WSDL. We will describe how to implement the resulting schema and WSDL in the next section.
1.5. Creating the project
In this section, we will be using Maven2 to create the
initial project structure for us. Doing so is not required, but greatly reduces the amount of code we have to write to setup our HolidayService.
The following command creates a Maven2 web application project for us, using the Spring-WS archetype (that is, project template)
mvn archetype:create -DarchetypeGroupId=org.springframework.ws \
-DarchetypeArtifactId=spring-ws-archetype \
-DarchetypeVersion=1.5.7 \
-DgroupId=com.ideeksha.spring.ws \
-DartifactId=SpringWebService
This command will create a new directory called SpringWebService. In this directory,
there is a 'src/main/webapp' directory, which will contain the root of the WAR file.
You will find the standard web application deployment descriptor 'WEB-INF/web.xml' here, which defines a Spring-WS MessageDispatcherServlet and maps all incoming requests to this servlet:
<web-app xmlns="http://java.sun.com/xml/ns/j2ee"
xmlns:xsi="http://www.w3.org/2001/XMLSchema-instance"
xsi:schemaLocation="http://java.sun.com/xml/ns/j2ee
http://java.sun.com/xml/ns/j2ee/web-app_2_4.xsd"
version="2.4">
<display-name>Store Department Order Service</display-name>
<servlet>
<servlet-name>order-ws</servlet-name>
<servlet-class>org.springframework.ws.transport.http.MessageDispatcherServlet</servlet-class>
</servlet>
<servlet-mapping>
<servlet-name>order-ws</servlet-name>
<url-pattern>/order-ws/*</url-pattern>
</servlet-mapping>
</web-app>
In addition to the above 'WEB-INF/web.xml' file, you will also need another,
Spring-WS-specific configuration file, named 'WEB-INF/order-ws-servlet.xml'.
This file contains all of the Spring-WS-specific beans such as EndPoints,
WebServiceMessageReceivers, and such like, and is used to create a new Spring container.
The name of this file is derived from the name of the attendant servlet (in this case
'order-ws') with '-servlet.xml' appended to it.
1.6. Implementing the Endpoint
In Spring-WS, you will implement Endpoints to handle incoming XML messages.
There are two flavors of endpoints: message endpoints and
payload endpoints. Message endpoints give access to the entire XML message, including SOAP headers. Typically, the endpoint will only be interested in the payload of the message, that is the contents of the SOAP body.
In that case, creating a payload endpoint makes more sense.
1.6.1. Handling the XML Message
In this sample application, we are going to use Castor to handle
the XML message.
OrderWSEndpoint.java
------------------------------
package com.ideeksha.order.ws;
import java.util.Iterator;
import java.util.List;
import org.apache.commons.logging.Log;
import org.apache.commons.logging.LogFactory;
import org.springframework.ws.server.endpoint.annotation.Endpoint;
import org.springframework.ws.server.endpoint.annotation.PayloadRoot;
@Endpoint
public class OrderWSEndpoint {
private static final Log LOG = LogFactory.getLog(OrderWSEndpoint.class);
@PayloadRoot(localPart = "OrderRequest", namespace = "http://ideeksha.gotdns.com/order")
public OrderResponse receiveOrder(
OrderRequest orderRequest) {
try {
List<Item> itemList = orderRequest.getItemList();
Iterator<Item> iterator = itemList.iterator();
while (iterator.hasNext()) {
Item item = iterator.next();
System.out.println(item);
}
} catch (Exception e) {
LOG.error("", e);
}
OrderResponse orderResponse = new OrderResponse();
orderResponse.setCode("SUCCESS");
return orderResponse;
}
}
We are using annoation to mark a class as Endpoint and the method which is to be executed for the particular type of request is denoted by
"@PayloadRoot(localPart = "OrderRequest", namespace = "http://ideeksha.gotdns.com/order")" anotaion.
So "receiveOrder" ,method will get executed if any OrderRequest is come for this EndPoint.
Because we use Castor, we must add some dependencies to the Maven pom.xml, which is in the root of our project directory. Here is the part of POM file:
<dependency>
<groupId>org.springframework.ws</groupId>
<artifactId>spring-ws-core-tiger</artifactId>
<version>1.5.6</version>
<exclusions>
<exclusion>
<groupId>log4j</groupId>
<artifactId>log4j</artifactId>
</exclusion>
</exclusions>
</dependency>
<dependency>
<groupId>jdom</groupId>
<artifactId>jdom</artifactId>
<version>1.0</version>
<exclusions>
<exclusion>
<groupId>log4j</groupId>
<artifactId>log4j</artifactId>
</exclusion>
</exclusions>
</dependency>
<dependency>
<groupId>jaxen</groupId>
<artifactId>jaxen</artifactId>
<version>1.1</version>
<exclusions>
<exclusion>
<groupId>log4j</groupId>
<artifactId>log4j</artifactId>
</exclusion>
</exclusions>
</dependency>
<dependency>
<groupId>javax.xml.soap</groupId>
<artifactId>saaj-api</artifactId>
<version>1.3</version>
<scope>runtime</scope>
<exclusions>
<exclusion>
<groupId>log4j</groupId>
<artifactId>log4j</artifactId>
</exclusion>
</exclusions>
</dependency>
<dependency>
<groupId>com.sun.xml.messaging.saaj</groupId>
<artifactId>saaj-impl</artifactId>
<version>1.3</version>
<scope>runtime</scope>
<exclusions>
<exclusion>
<groupId>log4j</groupId>
<artifactId>log4j</artifactId>
</exclusion>
</exclusions>
</dependency>
<dependency>
<groupId>org.codehaus.castor</groupId>
<artifactId>castor</artifactId>
<version>1.2</version>
<exclusions>
<exclusion>
<groupId>log4j</groupId>
<artifactId>log4j</artifactId>
</exclusion>
</exclusions>
</dependency>
<dependency>
<groupId>javax.annotation</groupId>
<artifactId>jsr250-api</artifactId>
<version>1.0</version>
</dependency>
</dependencies>
Here is how we would configure these classes in our order-ws-servlet.xml
Spring XML configuration file:
<beans xmlns="http://www.springframework.org/schema/beans">
<bean id="orderWSEndpoint" class="com.ideeksha.order.ws.OrderWSEndpoint" autowire="byName"/>
</beans>
1.6.2. Routing the Message to the Endpoint
Now that we have written an endpoint that handles the message, we must define how incoming messages are routed to that endpoint. In Spring-WS, this is the responsibility of an EndpointMapping. In this tutorial, we will route messages based on their content, by using a PayloadRootAnnotationMethodEndpointMapping. Here is how we configure a PayloadRootAnnotationMethodEndpointMapping in order-ws-servlet.xml:
<bean id="loggingInterceptor"
class="org.springframework.ws.server.endpoint.interceptor.PayloadLoggingInterceptor"/>
<bean
class="org.springframework.ws.server.endpoint.mapping.PayloadRootAnnotationMethodEndpointMapping">
<property name="interceptors">
<list>
<ref local="loggingInterceptor"/>
</list>
</property>
</bean>
This means that whenever an XML message is received it will check all the annonated EndPoint Class and check for the method which will serve the request with that particular namespace and local name.(It also adds a PayloadLoggingInterceptor,that dumps incoming and outgoing messages to the log.)
1.7. Publishing the WSDL
Finally, we need to publish the WSDL. As stated in Section 3.4, “Service contract”, we don't need to write a WSDL ourselves; Spring-WS can generate one for us based on some conventions.
Here is how we define the generation:
<bean id="orderWebService" class="org.springframework.ws.wsdl.wsdl11.DefaultWsdl11Definition">
<property name="schema" ref="orderSchema"/>
<property name="portTypeName" value="OrderResource"/>
<property name="locationUri" value="/order-ws/orderWebService"/>
<property name="targetNamespace" value="http://ideeksha.gotdns.com/order"/>
</bean>
<bean id="orderSchema" class="org.springframework.xml.xsd.SimpleXsdSchema">
<property name="xsd" value="/WEB-INF/orderService.xsd"/>
</bean>
The bean id determines the URL where the WSDL can be retrieved. In this case, the bean id is holiday, which means that the WSDL can be retrieved as holiday.wsdl in the servlet context. The full URL will typically be
http://localhost:8080/SpringWebService/order-ws/orderWebService.wsdl.
The schema property refers to the human resource schema we defined in Section 3.3, “Data Contract”, wrapped in a SimpleXsdSchema. We simply placed the schema in the WEB-INF directory of the application.
Next, we define the WSDL port type to be OrderResource.
We set the location where the service can be reached:
/order-ws/orderWebService/. We use a a relative URI and we instruct the framework to transform it dynamically to an absolute URI. Hence, if the service is deployed to different contexts we don't have to change the URI manually.
Finally, we define the target namespace for the WSDL definition itself. Setting these
is not required. If not set, we give the WSDL the same namespace as the schema.
1.8. Doing the Castor Mapping
We have to define the marshaller and unmashller for the XML messages.We define them in order-ws-servlet.xml file.
<bean id="marshaller" class="org.springframework.oxm.castor.CastorMarshaller">
<property name="mappingLocation" value="classpath:WEB-INF/castor-mapping.xml"/>
</bean>
<bean
class="org.springframework.ws.server.endpoint.adapter.GenericMarshallingMethodEndpointAdapter">
<constructor-arg ref="marshaller"/>
<constructor-arg ref="marshaller"/>
</bean>
O/X mapping is done using castor so you can assess the xml as object.Below is the OrderRequest and OrderResponse with its corresponding castor mapping:
OrderRequest.java:
-------------------
package com.ideeksha.order.ws;
import java.util.List;
public class OrderRequest {
private List<Item> itemList = null;
private String customerID;
private String orderID;
public List<Item> getItemList() {
return itemList;
}
public void setItemList(
List<Item> itemList) {
this.itemList = itemList;
}
public String getCustomerID() {
return customerID;
}
public void setCustomerID(String customerID) {
this.customerID = customerID;
}
public String getOrderID() {
return orderID;
}
public void setOrderID(String orderID) {
this.orderID = orderID;
}
}
OrderResponse.java
-----------------------
package com.ideeksha.order.ws;
public class OrderResponse {
private String code;
public String getCode() {
return code;
}
public void setCode(String code) {
this.code = code;
}
}
Item.java
--------------------
package com.ideeksha.order.ws;
public class Item {
private String id = null;
private String itemName = null;
private String sellingprice = null;
private String quantity = null;
private String discount = null;
public String getId() {
return id;
}
public void setId(String id) {
this.id = id;
}
public String getItemName() {
return itemName;
}
public void setItemName(String itemName) {
this.itemName = itemName;
}
public String getSellingprice() {
return sellingprice;
}
public void setSellingprice(String sellingprice) {
this.sellingprice = sellingprice;
}
public String getQuantity() {
return quantity;
}
public void setQuantity(String quantity) {
this.quantity = quantity;
}
public String getDiscount() {
return discount;
}
public void setDiscount(String discount) {
this.discount = discount;
}
@Override
public String toString() {
return id+ " " + itemName + " " + sellingprice + " " +quantity + " " + discount;
}
}
castor-mapping.xml
--------------------------------
<?xml version="1.0" encoding="UTF-8"?>
<!DOCTYPE mapping PUBLIC "-//EXOLAB/Castor Mapping DTD Version 1.0//EN"
"http://castor.org/mapping.dtd">
<mapping>
<description>Description of the mapping</description>
<class name="com.ideeksha.order.ws.OrderResponse">
<map-to xml="OrderResponse" ns-uri="http://ideeksha.gotdns.com/order" />
<field name="code">
<bind-xml name="code" node="element" type="string"/>
</field>
</class>
<class name="com.ideeksha.order.ws.Item">
<map-to xml="item" ns-uri="http://ideeksha.gotdns.com/order" />
<field name="id">
<bind-xml name="id" node="element" type="string"/>
</field>
<field name="itemName">
<bind-xml name="itemName" node="element" type="itemName"/>
</field>
<field name="quantity">
<bind-xml name="quantity" node="element" type="string"/>
</field>
<field name="discount">
<bind-xml name="discount" node="element" type="itemName"/>
</field>
<field name="sellingprice">
<bind-xml name="sellingprice" node="element" type="itemName"/>
</field>
</class>
<class name="com.ideeksha.order.ws.OrderRequest">
<map-to xml="OrderRequest" ns-uri="http://ideeksha.gotdns.com/order" />
<field name="customerID">
<bind-xml name="customerID" node="element" type="itemName"/>
</field>
<field name="orderID">
<bind-xml name="orderID" node="element" type="itemName"/>
</field>
<field name="itemList" type="com.ideeksha.order.ws.Item" collection="arraylist">
<bind-xml name="item" node="element" type="ideeksha-spring-ws:item"/>
</field>
</class>
</mapping>
You can create a WAR file using mvn install.
If you deploy the application (to Tomcat, Jetty, etc.), and point your browser at
this location, you will see the generated WSDL. This WSDL is ready to be used by clients, such as soapUI, or other SOAP frameworks.
I will explain how to create project in SOAPUI and send a order request to our webservice.
Create new Project in SOAP UI and give the project name and the wsdl file path.In my case the Project name is SpringWebSerice and the wsdl path will be
"http://localhost:8080/SpringWebService/order-ws/orderWebService.wsdl"
The click on "Order" and then to "request1" under the SpringWebService Project menu.
Edit the default values of this request.Now send this request be clicking on run button(green arrowhead) on the top of the request message window. And the you will get "SUCCESSFUL" as response as we are sending as Order response.


This conclude spring webservice turorial. You can download the source code for this article from http://www.mediafire.com/download.php?zxlmjmnuiei
Subscribe to:
Posts
(
Atom
)